|
Quality Information in one Place . . .
|

|
Quality Information in one Place . . .
|
This is the first interfacing example for the Parallel Port. We will start with something simple. This example doesn't use the Bi-directional feature found on newer ports, thus it should work with most, if no all Parallel Ports. It however doesn't show the use of the Status Port as an input. So what are we interfacing? A 16 Character x 2 Line LCD Module to the Parallel Port. These LCD Modules are very common these days, and are quite simple to work with, as all the logic required to run them is on board.

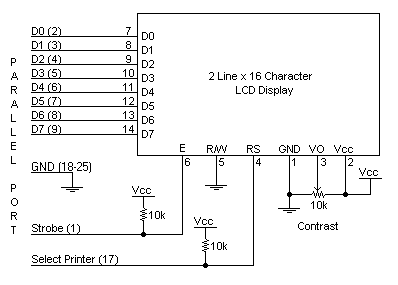
Above is the quite simple schematic. The LCD panel's Enable and Register Select is connected to the Control Port. The Control Port is an open collector / open drain output. While most Parallel Ports have internal pull-up resistors, there are a few which don't. Therefore by incorporating the two 10K external pull up resistors, the circuit is more portable for a wider range of computers, some of which may have no internal pull up resistors.
We make no effort to place the Data bus into reverse direction. Therefore we hard wire the R/W line of the LCD panel, into write mode. This will cause no bus conflicts on the data lines. As a result we cannot read back the LCD's internal Busy Flag which tells us if the LCD has accepted and finished processing the last instruction. This problem is overcome by inserting known delays into our program.
The 10k Potentiometer controls the contrast of the LCD panel. Nothing fancy here. As with all the examples, I've left the power supply out. You can use a bench power supply set to 5v or use a onboard +5 regulator. Remember a few de-coupling capacitors, especially if you have trouble with the circuit working properly.
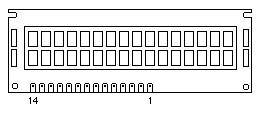
| The 2 line x 16 character LCD modules are available from a wide range of manufacturers and should all be compatible with the HD44780. The one I used to test this circuit was a Powertip PC-1602F and an old Philips LTN211F-10 which was extracted from a Poker Machine! The diagram to the right, shows the pin numbers for these devices. When viewed from the front, the left pin is pin 14 and the right pin is pin 1. |
 |
/*  LCD Module Software                                               */
/*  17th May 1997			                              */
/*  Copyright 1997 Craig Peacock                                      */
/*  WWW     - http://www.senet.com.au/~cpeacock                       */
/*  Email   - cpeacock@senet.com.au                                   */
/*                                                                    */
/*  Register Select must be connected to Select Printer (PIN 17)      */
/*  Enable must be connected to Strobe (PIN1)                         */
/*  DATA 0:7 Connected to DATA 0:7                                    */

#include <dos.h>
#include <string.h>

#define PORTADDRESS 0x378  /* Enter Your Port Address Here */

#define DATA PORTADDRESS+0
#define STATUS PORTADDRESS+1
#define CONTROL PORTADDRESS+2

void main(void)
{
 char string[] = {"Testing 1,2,3                           "
		  "It' Works !                             "};
 char init[10];
 int count;
 int len;
 init[0] = 0x0F; /* Init Display */
 init[1] = 0x01; /* Clear Display */
 init[2] = 0x38; /* Dual Line / 8 Bits */

 outportb(CONTROL, inportb(CONTROL) & 0xDF); /* Reset Control Port - Make sure Forward Direction */

 outportb(CONTROL, inportb(CONTROL) | 0x08); /* Set Select Printer (Register Select) */

 for (count = 0; count <= 2; count++)
  {
   outportb(DATA, init[count]);
   outportb(CONTROL,inportb(CONTROL) | 0x01); /* Set Strobe (Enable)*/
   delay(20);                                 /* Larger Delay for INIT */
   outportb(CONTROL,inportb(CONTROL) & 0xFE); /* Reset Strobe (Enable)*/
   delay(20);                                 /* Larger Delay for INIT */
  }

 outportb(CONTROL, inportb(CONTROL) & 0xF7);  /* Reset Select Printer (Register Select) */

 len = strlen(string);

 for (count = 0; count < len; count++)
  {
   outportb(DATA, string[count]);
   outportb(CONTROL,inportb(CONTROL) | 0x01); /* Set Strobe */
   delay(2);
   outportb(CONTROL,inportb(CONTROL) & 0xFE); /* Reset Strobe */
   delay(2);
  }
}
Above is the source code to get this example running. It's been written for Borland C, so if you are using a Microsoft compiler, then you will have to change the outportb() function to outp() and inportb() to inp().
The LCD panel requires a few instructions to be sent, to order to turn on the display and initialise it. This is what the first for loop does. These instructions must be sent to the LCD's Instruction Register which is controlled by the Register Select (Pin 4). When pin 4 is low the instruction register is selected, thus when high the data register must be selected. We connect this to the Parallel Port's Select Printer line which happens to be hardware inverted. Therefore if we write a '1' to bit 3 of the Control Register the Select Printer line goes low.
We want to first send instructions to the LCD module. Therefore the Register Select line must be low. As it is hardware inverted, we will want to set bit 3 of the Control Register to '1'. However we don't want to upset any other bits on the Control Port. We achieve this by reading the Control Port and OR'ing 0x80 to it. e.g. outportb(CONTROL, inportb(CONTROL) | 0x08); This will only set bit 3.
After we place a data byte on the data lines, we must then signal to the LCD module to read the data. This is done using the Enable line. Data is clocked into the LCD module on the high to low transition. The Strobe is hardware inverted, thus by setting bit 0 of the Control Register we get a high to low transition on the Strobe line. We then wait for a delay, and return the line to a high state ready for the next byte.
After we initialize the LCD Module, we want to send text to it. Characters are sent to the LCD's Data Port, thus we want to clear bit 3. Once again we must only change the one bit, thus we use outportb(CONTROL, inportb(CONTROL) & 0xF7);. Then we set up another for loop to read a byte from the string and send it to the LCD panel. This is repeated for the length of the string.
The delays should be suitable for most machines. If the LCD panel is not initializing properly, you can try increasing the delays. Likewise if the panel is skipping characters, e.g. Tst ,2. On the other hand, If the LCD module is repeating characters e.g. TTTeessttiinngg then you may have a faulting Enable connection. Check your Enable to Strobe connection.
| How to control HD44780-based Character-LCD |
Should you want to know more about the LCD Modules, Peer Ouwehand has done
a wonderful job of it or presenting it all. Well worth a look. |
| LCD Information and Technical Forum |
A good web page which includes information on many different types of LCD's.
Also includes a LCD Forum. |
| Interfacing the Parallel Port |
Want to know some more details about interfacing your Parallel Port? If so, then try out this Page. |